19
Jul
Adding a toolbar at backend of joomla component
- Category:
- Joomla
- Joomla Component

Posted On : July 19, 2013
| No Comment
This Joomla blog post will show you how to add toolbar at the backend of Joomla Component.
Class Used for Toolbar : JToolBarHelper
Class Location : “htdocs\administrator\includes\toolbar.php” .
Setting Title of toolbar
Function Used : title() of JToolBarHelper class.
Function Prototype : public static function title($title, $icon = ‘generic.png’);
$title = title of the toolbar
$icon = optional icon image to be used with the title. The default icon for title ‘generic.png’ can be found at location ‘htdocs\administrator\templates\bluestork\images\header’, where ‘bluestork’ is the current Administrator’s template.
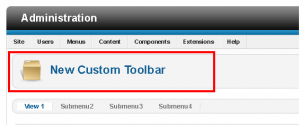
Usage : JToolBarHelper::title( ‘New Custom Toolbar’);
The above code creates the title of the toolbar with default icon as shown in the figure below.
Creating the toolbar Button
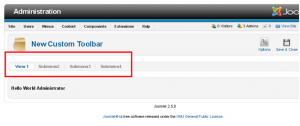
In this section we will create the toolbar as shown in the below figure.

For Creating the toolbar Button there are many functions defined in class JToolBarHelper to create the toolbar button.Some functions for toolbar Button is listed below.
1 2 3 4 5 6 7 8 9 10 11 12 13 14 15 16 17 18 19 | public static function trash($task = 'remove', $alt = 'JTOOLBAR_TRASH', $check = true) public static function apply($task = 'apply', $alt = 'JTOOLBAR_APPLY') public static function save($task = 'save', $alt = 'JTOOLBAR_SAVE') public static function save2new($task = 'save2new', $alt = 'JTOOLBAR_SAVE_AND_NEW') public static function save2copy($task = 'save2copy', $alt = 'JTOOLBAR_SAVE_AS_COPY') public static function cancel($task = 'cancel', $alt = 'JTOOLBAR_CANCEL') public static function checkin($task = 'checkin', $alt = 'JTOOLBAR_CHECKIN', $check = true) public static function preferences($component, $height = '550', $width = '875', $alt = 'JToolbar_Options', $path = '', $onClose = '') public static function publish($task = 'publish', $alt = 'JTOOLBAR_PUBLISH', $check = false) public static function custom($task = '', $icon = '', $iconOver = '', $alt = '', $listSelect = true) |
Let’s Create Save & Close Button
Following is the code:
1 | JToolBarHelper::save('save'); |
Let’s Create Options Button
1 | JToolBarHelper::preferences('com_helloworld'); |
Where,
‘com_helloworld’ is the component name whose options will be loaded.
Let’s Create Custom toolbar Button
For creating the custom toolbar button we will use custom() function of JToolBarHelper class as shown below.
1 2 | public static function custom($task = '', $icon = '', $iconOver = '', $alt = '', $listSelect = true); JToolBarHelper::custom('apply', 'checkin', 'checkin', 'Connect',false); |
Where, ‘apply’ is the name of the task to be performed on click event.’Connect’ is displayed below the button icon.’checkin’ is the button icon.This icon file is present in current Administrator’s template(\administrator\templates\bluestork\images\toolbar).This is linked in CSS file as shown below.
1 2 3 4 | .icon-32-checkin { background-image: url('/../images/toolbar/icon-32-checkin.png'); } |
JToolBarHelper will look for the name of the icon file after ‘.icon-32-’ and file name must me preceded by ‘icon-32-’.
Creating the Submenu at backend
Class Used : JSubMenuHelper
Class Location : “htdocs\administrator\includes\toolbar.php”
Function Used : addEntry() of JSubMenuHelper class.
Function Prototype : public static function addEntry($name, $link = ”, $active = false);
Where,
1 2 3 4 5 6 7 | $name = Name of the Submenu. $link = Link to open on clicking of the Submenu. $active = true if the submenu is active and false otherwise. Usage : JSubMenuHelper::addEntry('View 1', 'index.php?option=com_helloworld&view=helloworld',true); JSubMenuHelper::addEntry('Submenu2', 'index.php?option=com_helloworld'); JSubMenuHelper::addEntry('Submenu3', 'index.php?option= com_helloworld '); JSubMenuHelper::addEntry('Submenu4', 'index.php?option= com_helloworld '); |
You will see the output as shown in the below figure.
Complete code can be defined in helloworld.php (admin folder) file of helloworld component as follows:
Hello World Administrator
1 2 3 4 5 6 7 8 9 10 | <!--?php JToolBarHelper::title( 'New Custom Toolbar'); JToolBarHelper::preferences('com_helloworld'); JToolBarHelper::save('save'); JToolBarHelper::custom('apply', 'checkin', 'checkin', 'Connect',false); JSubMenuHelper::addEntry('View 1', 'index.php?option=com_helloworld&view=com_helloworld',true); JSubMenuHelper::addEntry('Submenu2', 'index.php?option=com_helloworld'); JSubMenuHelper::addEntry('Submenu3', 'index.php?option=com_helloworld'); JSubMenuHelper::addEntry('Submenu4', 'index.php?option=com_helloworld'); ?--> |


