12
Aug
Changing Legal File Types and Maximum Upload Size in joomla
- Category:
- Joomla

Posted On : August 12, 2013
| No Comment
By default, Joomla only allows you to upload certain file types and only allows you to upload files of a certain size.
For example, these are the file types that a normal Joomla site allows:
bmp, csv, doc, gif, ico, jpg, jpeg, odg, odp, ods, odt, pdf, png, ppt, swf, txt, xcf, xls, BMP, CSV, DOC, GIF, ICO, JPG, JPEG, ODG, ODP, ODS, ODT, PDF, PNG, PPT, SWF, TXT, XCF, XLS. That list doesn’t include many popular file extensions including many from the latest versions of Microsoft Office.
Fortunately, you can easily change these settings. Here’s how:
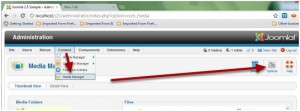
Step 1:- Access the Media Manager Options.
Go to Content > Media Manager > Options.
Step 2:- Add or Delete the extensions from the list
Go to the Component tab and modify the list Legal Extensions (File Type)
• The file extensions must be listed in alphabetical order,
• Separate them with a comma.
• Do NOT use the “.” (dot) in the extension name (should be png,gif not .png,.gif)
• Put both lower case and uppercase versions in the same line.
Step 3:- Increase the Maximum Upload Capacity
Change the default of 10 MB to whatever value you deem appropriate.
Notice you can also change other parameters here. It’s not recommended that you change any of these other parameters unless you know what you are doing. Mouse over them and you will get tooltips describing what they do. A good rule of thumb – If you don’t understand the tooltips, you probably don’t need to change them.
Media Settings:
Legal Extensions (File Types):- These are the file types users are allowed to upload. By default, when Joomla! is installed, basic image and document files are allowed.
Maximum Size (in bytes):- The maximum file size users are allowed to upload, in bytes. The default setting is 10000000 (or 10mb).
Path to Media Folder:-The path where non-image media files are located, including videos and document files. The default is “/images”. You can create a new folder to use with the Media Manager and enter the path to that folder here. Warning: Do not delete or rename the existing “/images” folder on your server. This folder and its subfolders “images/banners”, “images/M_images”, “images/smiles”, and “images/stories” are used by Joomla!. Deleting or renaming these folders may cause errors.
Path to Image Folder:-The path where images are stored. The default is “/images/stories”. You can create a new folder to use with the Media Manager and enter the path to that folder here. If you want to access this folder from the Media Manager, either use the default value or make the new folder a sub-folder of the Media Manager folder. Warning: Do not delete or rename the existing “images/stories” folder on your server. This folder is used by Joomla! and deleting or renaming it will cause errors.
Restrict Uploads:-This feature restricts uploads by user type. The default setting is Yes.
Check MIME Types:-This uses MIME Magic or Fileinfo to verify files. The default setting is Yes. By checking the MIME information, you help ensure users don’t upload malicious files to your site. If invalid MIME type errors are received then change the setting to No.
Legal Image Extensions (File Types):-This allows you to limit the types of images that can be uploaded. It operates by checking the file image headers. By default, Joomla! only allows bmp,gif,jpg,png.
Ignored Extensions:-This sets which extensions are ignored for MIME type checking and restricts uploads. By default, no extensions are ignored.
Legal MIME Types:-This sets the list of legal MIME types for uploads. By default, Joomla! automatically includes some standard file types. It is recommended that you do not touch this setting unless you know what you are doing.
Illegal MIME Types:-This sets the list of illegal MIME types for uploads. By default, Joomla! automatically blocks HTML MIME types. It is recommended that you do not touch this setting unless you know what you are doing.
Enable Flash Uploader:-This setting enables the integrated Flash Uploader which is used for example at the Media Management. If enabled it is possible to upload several files at once. Default setting is No. Tip: if enabled and the download does not work, disable the flash uploader (can happen due incompatible flash settings by Adobe).
- Tags:


