04
Jul
APNS (Apple Push Notification Service), Embed with Application.
- Category:
- iPhone iOS
- PHP

Posted On : July 4, 2013
| 3 Comments
Sometimes we need to notify users about the new updates or about an event in an application. Apple has provided features that can be use for this. One of these features is Local Notification and another is Push Notification. In these features we can have messages, or any other data from server.
In Local Notification, notification is local to device on which the application is installed. User can schedule local notification by setting date and time.
In Push Notification (remote notification), the message or data about an event is sent from remote server through APNS (Apple Push Notification Service) to the users devices. When Push Notification receives it contains payload that contains message or sound or any other data, which can be access through Remote notification methods.
When notification received to device, it shows an alert message, plays sound or add the badge on app icon. This notification can be received on devices when application is in foreground, background or inactive state. When there is notification alert is propagated and if user clicks on action button, it launches the application and calls their respective methods.
Let’s have brief introduction about APNS:
APNS (Apple Push Notification Service) is developed by Apple. It provides remote notification service that propagates push notification to all devices to which the application is registered to receive push notification. To receive push notification, application is require to register and pass device token to remote server (application provider). When any new update or event occurs for an application, the remote server sends a notification to target device through APNS server.
Push Notification works only on devices, we cannot test it on simulator.
Now, Let’s see how Push Notification Service works:
First of all, we have to enable Push Notification by confirming with the user, to receive Notification on their device. To enable push notification, we have to add the functionality in our application that propagates an alert message, when app launches first time on user’s device, asking user to enable push notification to receive any new updates or news from the application. If user clicks on action button, it will be enabled push notification on that device.
Once the user enables Push Notification, we will get device token for user’s device. This device token is used on server side to identify devices, which have installed the application and enabled push notification. When we get device token, it can be sent to server.
When any new update or message regarding application or any new update arrives, the remote server prepares payload and send it to APNS server with device tokens. When new notification payload received at APNS server from remote server, the APNS server sends Push Notification to available devices.
===================================================================================================
To enable push notification, first of all we require to have SSL Certificate, App ID enabled with push notification and Private key and Provisioning Profile. If you already have this stuffs you can continue with the next step, otherwise create these as steps, which I have stated below:
Step 1: Create a Certificate from Keychain Access.
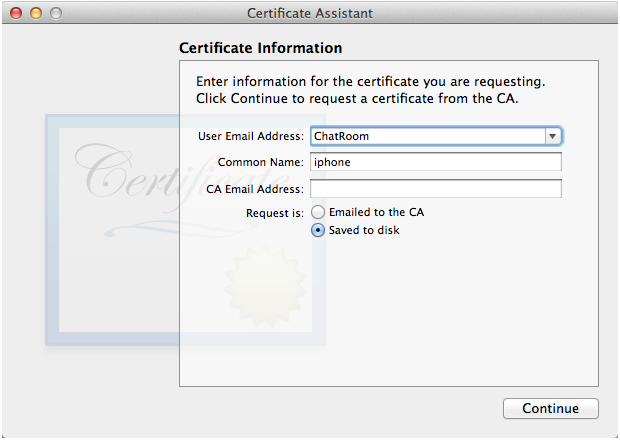
Open Keychain access, go to Certificate Assistant >> Request a Certificate from Certificate Authority… (If this option is not available in your keychain access then there will be option Request a Certificate from Certificate Authority with key available), from Keychain Access menu.
Once you select this option you will be have screen like:
In this screen, we have to enter email address and Common name for an application. It is recommended to enter an email address, which you have passed at the time of sign up in iOS Developer Program. But we can enter any other email address too. In Common Name, it can be anything but should be descriptive to application.
And choose the option, Save to disk. Once you enter all these details, click on continue button. It will ask you to enter the name to you want to give your file. Enter any name and save this file to your system
Now, open Keychain and go to keys, showing in left panel of Keychain Access wizard. In this screen we can see private key of our certificate we created. Right click on this key and export it to your system. It will ask you to enter passphrase. It will be used later while making connection to APNS server.
Step 2: Create App ID and Generate SSL Certificate
We require a unique id for application, which will be used when sending push notification to identify specific application.
To create a unique id, Login to iOS Dev Center and select Certificates, Identifiers & Profiles option
In the next screen select Identifiers option from left penal, in iOS Apps section:
In the next screen, select App IDs under the identifiers option in left panel and click on “+” button showing on the right hand side:
(In above image I’ve hide Apps id )
Once you click on “+” button, you will show a screen where you have to enter required the details and make sure you have enabled Push Notification in this screen. In Bundle Identifier, you have to enter the Bundle ID, which you use in your project.
Note that you need to use same Bundle ID in your project.
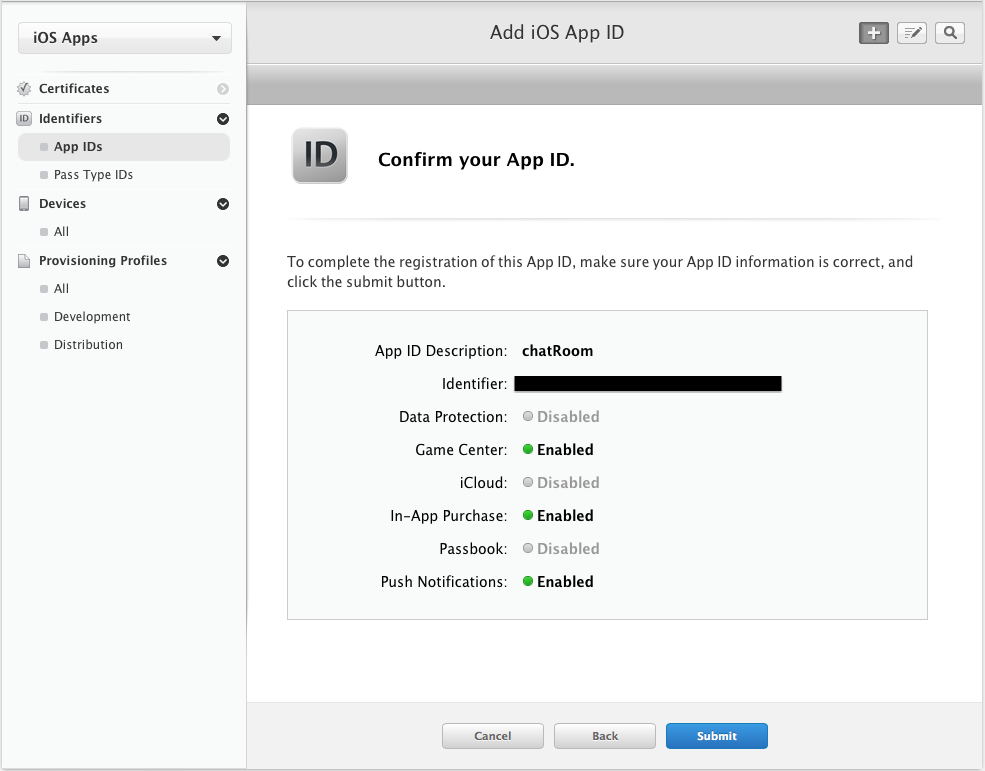
When you fill up all information, click on Continue. Then you will be navigate to a screen where you need to verify all the details and if everything is OK then click on Submit button.
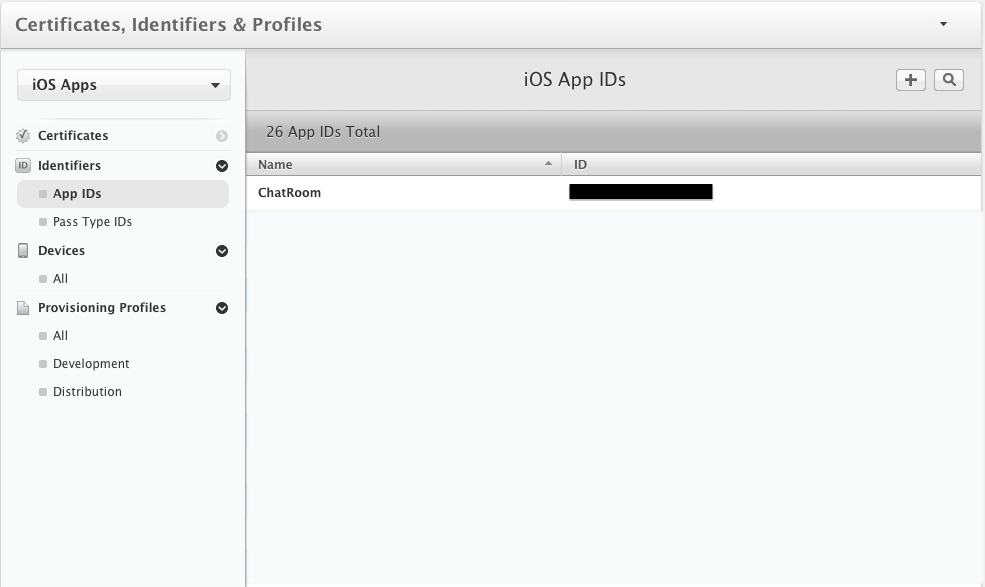
When you click on submit button, you will get the screen like this:
(In above image I’ve hide Apps id )
This screen shows your all App IDs. Select chatRoom ID from the list. When you select this ID, the screen will be opened as below:
In this screen click on Settings button. When you click on settings button, you will be presented a screen like:
Scroll down in the same screen and select the Create Certificate option in the Development SSL Certificate.
As we already have created CSR Certificate in our first step, click on Continue button:
In the next screen, select the option choose file in the next screen. Upload the CSR file, which we have created in our first step and click on Generate.
Click on Continue button when process is completed and then Download the SSL Certificate:
After completing this process, you will be have SSL Certificate which will be used when making connection with APNS server to get Push Notification. The purpose of using this App ID and certificate is, only your app could get notification from APNS server by using this App ID and Certificate. This certificate will valid till 3 months and you can download it again from here whenever you need it.
We need to create Production SSL Certificate when releasing app to iTunes by following the same steps.
(Note: Copy the bundle id and product name, which is passed in detail. It will to be used the same when creating app)
Step 3: Create Provisioning Profile
When we successfully complete the process of creating App ID, we need to create a provisioning profile for our app.
Select Provisioning Profiles option, showing on left panel of screen and click on the “+” button as shown below in figure:
(In above image I’ve hide Apps id )
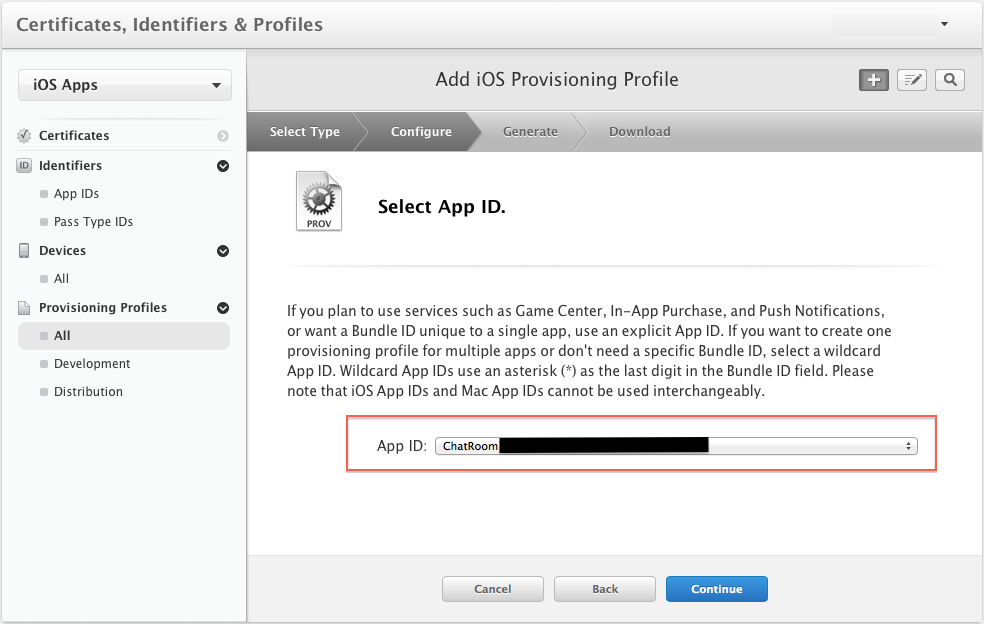
Next , Select type of profile we want to create. For now we will select the option “iOS App Development” and click on Continue.
Select App ID, which we just created for our app. This will create provisioning profile for our app. Click on Continue.
When we click on continue button, it will open up the screen where we have to certificate which we want to configure with our provisioning profile.
In the next screen, select devices
When complete selecting device’s, click on continue. In the next screen we will enter profile Name.
Now, Click on Generate and Download the provisioning profile. After downloading provisioning profile, Double click on it. It will be installed and we can see it in our project’s build settings.
After these steps we will have three files CSR, Private Key and SSL Certificate.
These files are used when making connection to the APNS Server. But at this time we will not use the same format file as it is. As push service is implemented on server side, we need to convert these files into .pem format so that the server can easily use it. Here we will convert both the files Private Key and SSL Certificate into .pem and combine it into a single .pem file.
To convert files into .pem format, open up terminal on your system and go to the directory where you want to store the .pem files and execute commands step by step as given below:
Step 1: Convert SSL Certificate into .pem format
openssl x509 -in Certificate.cer -inform der -out
Certificate.pem
Here, Certificate.cer is our SSL Certificate, which we have downloaded while creating App
ID. And the Certificate.pem is the .pem format file of our SSL Certificate.
Step 2: Convert Private key into .pem format
openssl pkcs12 -nocerts –out PrivateKey.pem -in
PrivateKey.p12
Here, PrivateKey.p12 is our private key, which we have downloaded from keychain. And the PrivateKey.pem is the .pem format file of our private key.
When we execute this command, we will be asked to enter the passphrase. At this time we have to enter password which we have given at the time of downloading the private key from keychain.
Once we will enter correct password, we will be asked to generate new password for new PrivateKey.pem. It will be used in PHP Script at the server side.
Step 3: Combine both Certificate.pem and PrivateKey.pem into a single .pem file
cat Certificate.pem PrivateKey.pem > ck.pem
This command will create (if not exist) and copy both Certificate.pem And PrivateKey.pem into a single file ck.pem
Step 4: Make a connection to APNS Server
telnet gateway.sandbox.push.apple.com 2195
If you see this…
” Trying 17.172.232.226… Connected to gateway.sandbox.pushapple.com.akadns.net.
Escape character is ‘^]’.“
response after executing this command, then your system can now reach to APNS server.
Step 5: Initialize connection to APNS Server
openssl s_client –connect
gateway.sandbox.push.apple.com:2195
-cert Certificate.pem -key PrivateKey.pem
After executing this command, the connection to APNS Server will be initialized for your app.
Step 6: Execute PHP script
php PHP_SCRIPT_NAME.php
Once the connection initialized to APNS successfully, execute the below command to run PHP script on server side
You can create php file as below..
| <?php
// Put your device token here (without spaces): $deviceToken = ‘Add your device token here..’;
// Put your private key’s passphrase here: $passphrase = ‘––––––’;
// Put your alert message here: $message = ‘Hi, This is Apple push notification’;
////////////////////////////////////////////////////////////////////////////////
$ctx = stream_context_create(); stream_context_set_option($ctx, ‘ssl’, ‘local_cert’, ‘ck.pem’); stream_context_set_option($ctx, ‘ssl’, ‘passphrase’, $passphrase);
// Open a connection to the APNS server $fp = stream_socket_client( ‘ssl://gateway.sandbox.push.apple.com:2195′, $err, $errstr, 60, STREAM_CLIENT_CONNECT|STREAM_CLIENT_PERSISTENT, $ctx);
if (!$fp) exit(“Failed to connect: $err $errstr” . PHP_EOL);
echo ‘Connected to APNS’ . PHP_EOL;
// Create the payload body
$body['aps']= array( ‘alert’=> $message, ‘badge’=>1, ‘sound’=> “1003″, );
// Encode the payload as JSON $payload = json_encode($body);
// Build the binary notification $msg = chr(0) . pack(‘n’, 32) . pack(‘H*’, $deviceToken) . pack(‘n’, strlen($payload)) . $payload;
// Send it to the server $result = fwrite($fp, $msg, strlen($msg));
if (!$result) echo ‘Message not delivered’ . PHP_EOL; else echo ‘Message successfully delivered’ . PHP_EOL;
// Close the connection to the server fclose($fp); |
(Note: PHP Script is the server side implementation to send remote notification to devices, Before execute this php script, Execute xCode project in device.)
Now, we will look at how to implement Push Notification in our xcode project:We have to add some code in project to implement APNS
àIn AppDelegate.m
In AppDelegate.m file, in “didFinishLaunchingWithOptions” method add the code to send a permission request to user for receive remote notification:
| [[UIApplication sharedApplication]
registerForRemoteNotificationTypes: (UIRemoteNotificationTypeBadge | UIRemoteNotificationTypeSound | UIRemoteNotificationTypeAlert)];
|
This code will pop up an alert on users’ device, asking for permission to receive remote notification. The user will be asked for permission only once when application launches for the first time.
Once the user agrees to receive remote notification,
| -(void)application:(UIApplication*)application
didRegisterForRemoteNotificationsWithDeviceToken:(NSData*)deviceToken{} |
This method will be called n we can have device token, which can be used to send remote notification.
When the application is alive and receives notification, “didReceiveRemoteNotification”
will be called. To handle event when application receive, you can use this method.
| -(void)application:(UIApplication *)application
didReceiveRemoteNotification:(NSDictionary *)userInfo{
if (application.applicationState == UIApplicationStateActive) // When application is in foreground else if (application.applicationState == UIApplicationStateBackground) // When application is in background else if (application.applicationState == UIApplicationStateInactive) // When application is not running } |
This method will be called only when the application is active.
If application is inactive and receive remote notification and user click on alert button to launch application, you can have this event by adding the below code in “didFinishLaunchingWithOptions” method:
| NSDictionary *pushNotificationPayload = [launchOptions
valueForKey:UIApplicationLaunchOptionsRemoteNotificationKey];
if(pushNotificationPayload) { [self application:application didReceiveRemoteNotification:pushNotificationPayload]; }
|
In the first line of the code, copying the payload data to NSDictionary. And in the second line “didReceiveRemoteNotification” will be called. And then it will be work in the same way as it works when application is in active state
To execute this project in device, first select the provisioning profile, which we have created. And enter the bundle id which we passed while creating App ID, in .plist file and
And also in summary of our project’s target:
Now, we will see how it works when execute this project in device
When we launch the application for the first time it will propagate alert such as:
If user select OK, then it can receive push notification. But if user selects “Don’t Allow” option, then it can never get notification.
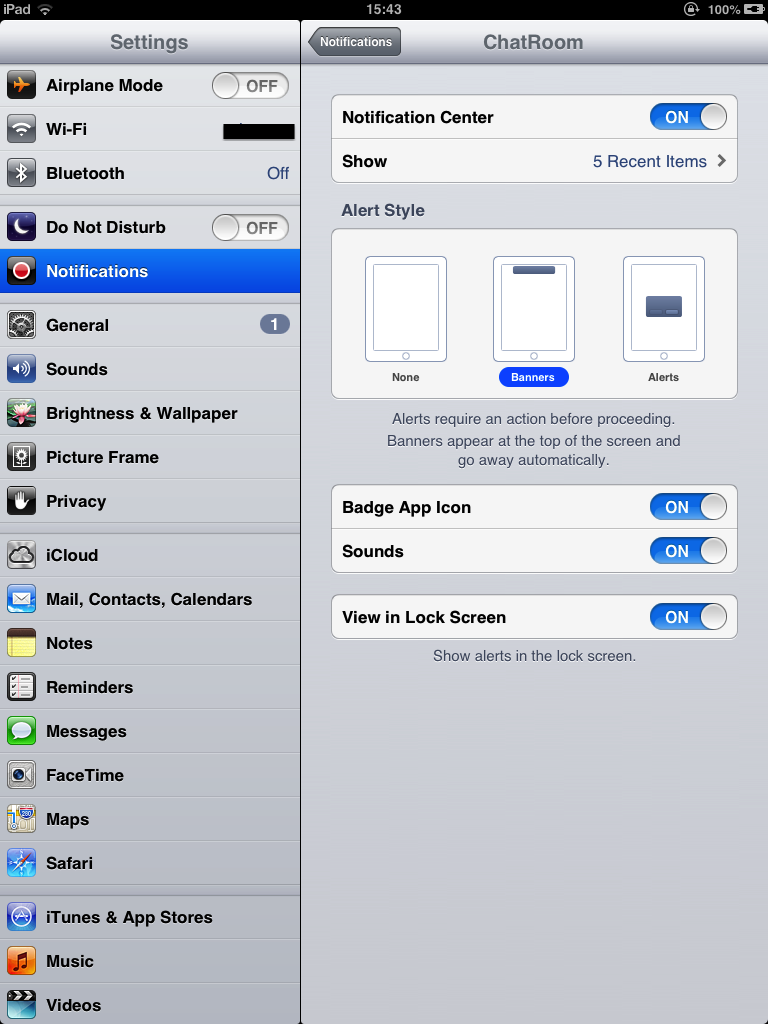
When we execute the app, it will be added in device’s settings in Notification.
If user wishes to enable Push Notification, once it has selected “Don’t allow” option, then it can be done from settings of device. To do this user need to go to Setting > notification. Here user can select the app from the list of applications. User can choose notification style here such as badge, sound or alert.
 Lets see how can we add custom sound in our Push Notification
If we want to add any custom sound when receive remote notification, It should be pass the sound name from the server (local server, Not an APNS server) side and the same name sound file we have to add in project too.
The iOS devices supports three types of sound files i.e. ” .wav, .caf and .aiff ”
We have to convert any sound file into one of these formats by executing the command in terminal:
afconvert /System/Library/Sounds/Sound.aiff
~/Desktop/sound.caf -d ima4 -f caff –v
This command generates the sound.caf file from Sound.aiff.
Now, you can add this sound to your project.
What if we want to use system selected sound:
As per apple’s multimedia programming guide we cannot use any selected sound from device:
“System-supplied alert sounds and system-supplied user-interface
sound effects are not available to your application. For example,
using the kSystemSoundID_UserPreferredAlert constant as a parameter to the AudioServicesPlayAlertSound function will not play anything.”
There is no API available to use current sound from device.
But, we can use any static sound from system’s sounds
There is AudioToolbox framework available, which can be used to add a static custom
sound in application.
- Tags:








Posts
This piece of writing is truly a pleasant one it helps new internet visitors, who are wishing in favor of blogging.
Ottawa
I’ve learn good stuff here. Definitely bookmarking for revisiting. I wonder how much effort you put in to make any such great informative website.
lassetter
What’s up, I check your blog on a regular basis. keep doing what you’re doing!
murray